Warning: preg_replace(): The /e modifier is deprecated, use preg_replace_callback instead in ..../includes/class_bbcode.php on line 2958

Warning: preg_replace(): The /e modifier is deprecated, use preg_replace_callback instead in ..../includes/class_bbcode.php on line 2958

Warning: preg_replace(): The /e modifier is deprecated, use preg_replace_callback instead in ..../includes/class_bbcode.php on line 2958
Question(s) for those who've rebuilt their SN's...
Page 1 of 8 123 ... LastLast
Results 1 to 15 of 110

Thread: Question(s) for those who've rebuilt their SN's...

  1. #1
    SCH Owner Michael's Avatar
    Join Date
    Aug 2005
    Location
    The Motor City
    Posts
    1,373

    Question(s) for those who've rebuilt their SN's...

    Hi everyone,

    I've got a couple of quick questions for those who have rebuilt (or are currently rebuilding) their Paxton SN superchargers. I'm hoping you guys can help me out.

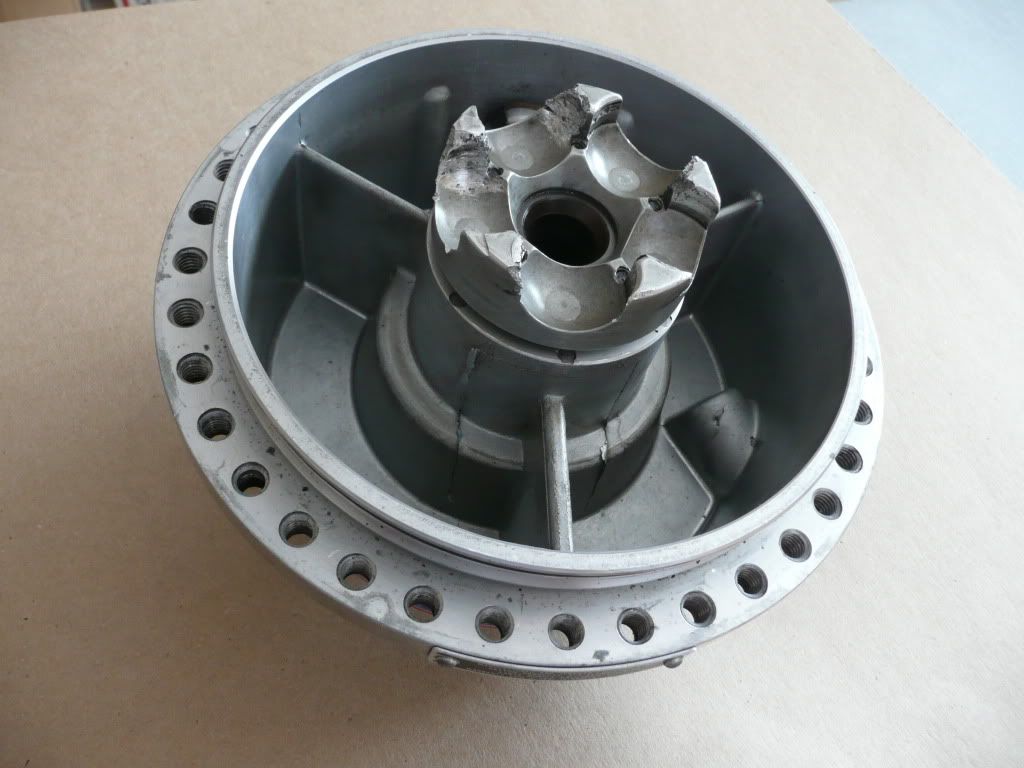
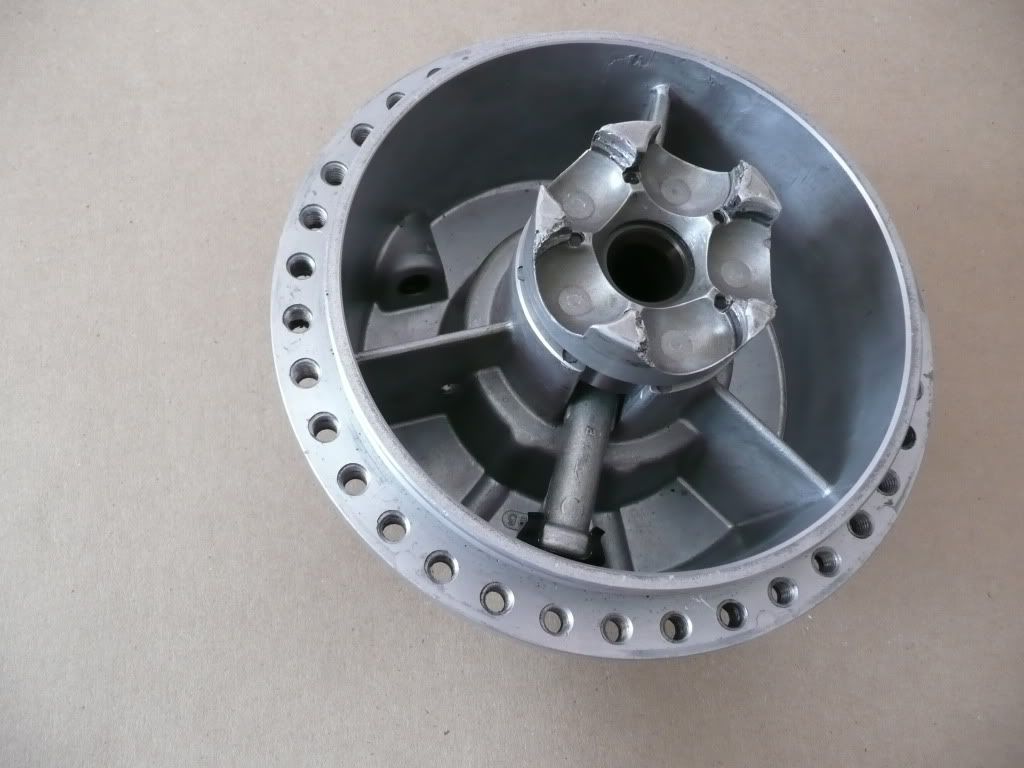
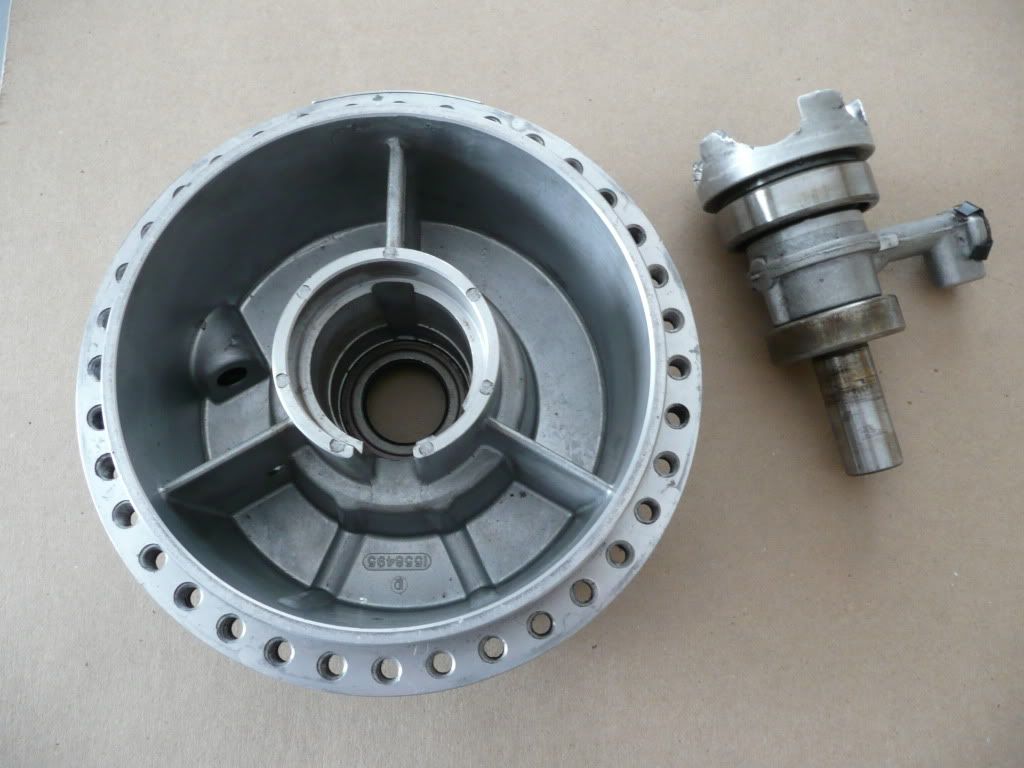
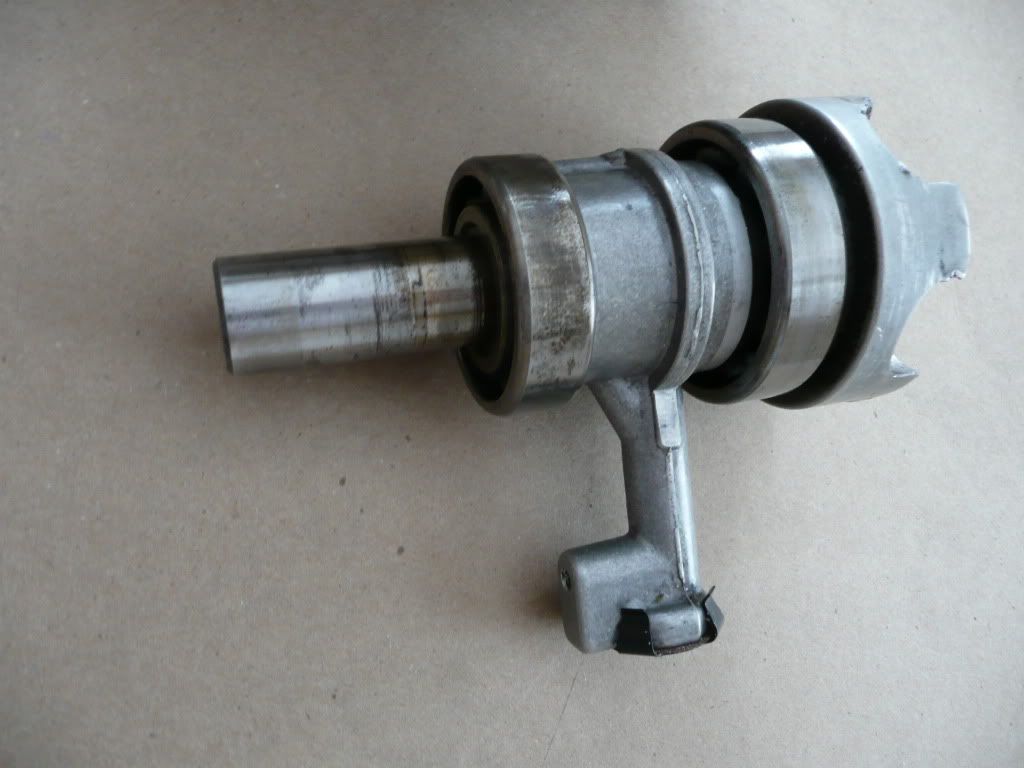
    1. How many bearing race lock pins did you use/install in your SN? The exploded drawing floating around shows only one pin, but from photos I've seen both the flange and the scroll housing have holes/slots for lock pins.

    2. How many shims did you use behind the belleville spring/washer? From what I've read and seen, several tend to be used in order to put the appropriate amount of pressure on the drive balls, but the exploded drawing shows only one shim.

    3. Is the belleville spring/washer considered a wear item (like the balls, races, carrier, impeller shaft, bearings, seals, etc...) or is it reused during a typical rebuild?

    That's it for now... but I'm sure I'll have more questions later.

  2. #2
    Senior SCH Member pavement pounde's Avatar
    Join Date
    Nov 2004
    Location
    Netherlands
    Posts
    715
    When I ordered a complete rebuild kit from Craig of Paradize wheels I got everything but the bellevue washer.
    From the 5 Sn's that I in a cople of years have rebuild the Bellevue washer was never worn exept for an exploded VR4 I got but that looked like a bomb went off inside.
    I have had pinned and slotted races and they all used 1 pin or slotpin.
    Every SN used a different amound and sizes of shims, before and after the rebuild.
    Due to some beginner mistakes from my side I had to rebuild my first SN93 3 times in total by replacing the inpellershaft, becouse I kept using the same amount of shims and not checking the torque to turn the pulley, meaning I had to reshim it and notised that there is some tolerances between impellershafts.
    Greets, Marco
    '91 Chevy 496SS, Edelbrock Pro-flo 2 injection, alu. GMPP heads, blowercam, coolmist water injection, turbo in the works.
    *VIDEO* http://www.youtube.com/watch?v=6ZOdXg0TOdw

  3. #3
    SCH Owner Michael's Avatar
    Join Date
    Aug 2005
    Location
    The Motor City
    Posts
    1,373
    Hi Marco,

    Thanks very much for your answers. Very good info.

    Seeing as you've rebuilt a few SN's, have you ever encounter a situation where the impeller shaft proved difficult to separate from the impeller? If so, what did you do to separate the impeller shaft from the impeller?

  4. #4
    Senior SCH Member pavement pounde's Avatar
    Join Date
    Nov 2004
    Location
    Netherlands
    Posts
    715
    What I always do is unscrew the impellerbolt a cople of threats and gently tap the bolt and side of the impeler with a rubber hammer, ofcoarse very softley on the impeller and a little harder on the bolt.
    Tap not hammer.
    Greets, Marco
    '91 Chevy 496SS, Edelbrock Pro-flo 2 injection, alu. GMPP heads, blowercam, coolmist water injection, turbo in the works.
    *VIDEO* http://www.youtube.com/watch?v=6ZOdXg0TOdw

  5. #5
    SCH Owner Michael's Avatar
    Join Date
    Aug 2005
    Location
    The Motor City
    Posts
    1,373
    Quote Originally Posted by pavement pounde View Post
    What I always do is unscrew the impellerbolt a cople of threats and gently tap the bolt and side of the impeler with a rubber hammer, ofcoarse very softley on the impeller and a little harder on the bolt.
    Tap not hammer.
    Thanks again for the information.

    So you've never come across the need to heat the impeller (using either propane or oxy-acetylene) in order to make it easier to remove the impeller shaft?
    Last edited by Michael; 03-04-2011 at 01:55 PM.

  6. #6
    Senior SCH Member pavement pounde's Avatar
    Join Date
    Nov 2004
    Location
    Netherlands
    Posts
    715
    No, but it can work, however watch out not to cook the impeller seal, expensive sucker there.
    Greets, Marco
    '91 Chevy 496SS, Edelbrock Pro-flo 2 injection, alu. GMPP heads, blowercam, coolmist water injection, turbo in the works.
    *VIDEO* http://www.youtube.com/watch?v=6ZOdXg0TOdw

  7. #7
    SCH Owner Michael's Avatar
    Join Date
    Aug 2005
    Location
    The Motor City
    Posts
    1,373
    Speaking of the impeller seal (the carbon fibre seal, right?), how do you remove it from the scroll housing?

  8. #8
    Senior SCH Member pavement pounde's Avatar
    Join Date
    Nov 2004
    Location
    Netherlands
    Posts
    715
    Just pry it out with a screwdriver, you hardley can not get it out undamaged.
    Just stick a crewdriver trought it.
    Greets, Marco
    '91 Chevy 496SS, Edelbrock Pro-flo 2 injection, alu. GMPP heads, blowercam, coolmist water injection, turbo in the works.
    *VIDEO* http://www.youtube.com/watch?v=6ZOdXg0TOdw

  9. #9
    SCH Owner Michael's Avatar
    Join Date
    Aug 2005
    Location
    The Motor City
    Posts
    1,373
    Before I try your suggestion of using a screw driver (I'd rather not destroy the seal, even though I'll be replacing it with a new one), I am going to try and find a suitably sized socket which I can use as a 'punch' to gently knock it out.

    BTW - your suggestion for removing the impeller shaft worked perfectly. No need to heat the impeller. Just a few firms taps on the impeller shaft's bolt with a rubber mallet and out it came.

    How would you suggest removing the main shaft (the one with the ball carrier on the end) from the oil case? I've read on here that I will need a press to remove/install the bearings that are in the oil case, but there was no mention of whether or not I'd need a press to remove the main shaft itself. Suggestions?

  10. #10
    Senior SCH Member pavement pounde's Avatar
    Join Date
    Nov 2004
    Location
    Netherlands
    Posts
    715
    I heated the case and out comes the shaft with the bearings, then you can use a puller/press for the bearings or heat up the bearings to get them off.
    Bud before you do that take out the oilpump shaft that is located inside the oil pickup shaft.
    I made a little write up with pictures on the truckclub I am a member of, mind you that it was my first rebuild and sins then I have learned a lot improvements on this board.

    http://www.454ss.com/Articles/include2.asp?id=62

    Pictures: http://smg.photobucket.com/albums/v1...ton%20rebuild/

    Hope this help.
    Greets, Marco
    '91 Chevy 496SS, Edelbrock Pro-flo 2 injection, alu. GMPP heads, blowercam, coolmist water injection, turbo in the works.
    *VIDEO* http://www.youtube.com/watch?v=6ZOdXg0TOdw

  11. #11
    SCH Owner Michael's Avatar
    Join Date
    Aug 2005
    Location
    The Motor City
    Posts
    1,373
    Looking at the photos you have on Photobucket, the SN93 front housing (what I've been calling the oil case) is different from the SN89. The bearing/oil pump carrier of the SN93 (and I'm guessing all Paxton blowers subsequent to the SN89) is a separate unit from the oil case itself. On the SN89, the bearing carrier, oil pump carrier, and oil case are all one-piece.

    Here's a photo of the SN89's oil case to illustrate what I mean (yes, the ball carrier is mangled!):


    How would suggest I tackle removing the main shaft (and oil pump/bearings) in this case?

    BTW - it doesn't look like your article on 454ss.com is still there. Either that, or only members can access it.

  12. #12
    Senior SCH Member pavement pounde's Avatar
    Join Date
    Nov 2004
    Location
    Netherlands
    Posts
    715
    Oh yes, ofcoarse they are somwhar different, you can hear up the inside of the case and the shaft and should fall out, and helping it by gentley tapping the shaft on the front side.
    Greets, Marco
    '91 Chevy 496SS, Edelbrock Pro-flo 2 injection, alu. GMPP heads, blowercam, coolmist water injection, turbo in the works.
    *VIDEO* http://www.youtube.com/watch?v=6ZOdXg0TOdw

  13. #13
    Senior SCH Member
    Join Date
    Oct 2005
    Location
    CHICAGO SUBURBS
    Posts
    191
    I didn't require heat for removing it on either of the two SN89's I have taken apart. Some slight tapping is all that is required on the front of the shaft to get the assembly out. I simply tap the shaft onto the workbench while holding the housing.
    Last edited by JPJP; 03-03-2011 at 08:54 PM. Reason: auto editor thought I was swearing so I removed the abbrev.

  14. #14
    SCH Owner Michael's Avatar
    Join Date
    Aug 2005
    Location
    The Motor City
    Posts
    1,373
    Success!!! I've managed to get the main drive shaft out of the oil case/bearing housing!

    I initially tried JPJP's suggestion of taping the end of the shaft against my workbench surface while holding the housing. This caused the shaft seal to move past the front oil seal and fall onto my work bench (good). But after what felt like a bit too much 'hammering' against the bench, the shaft only moved a small amount out of the case. So following pavement pounde's suggestion, I used a small propane torch to heat the inside of the case (primarily around where the large bearing sits) for a couple of minutes, then after a few more firm taps the shaft came right out.


    The case looks to be in good shape. No cracks or damage.


    Of course, the next question is how do I remove the two bearings from the main drive shaft?


    I know it's been mentioned that either a press or a puller is needed to get the bearings off the shaft. I've never used a press before (I don't have one, so I am going to have to find someone who does); I'd imagine a bearing puller isn't very expensive and probably a worthwhile investment.

    Suggestions?

  15. #15
    Senior SCH Member
    Join Date
    Oct 2005
    Location
    CHICAGO SUBURBS
    Posts
    191
    You could also heat up the inner race w/ a torch to expand it. That's what I did with mine. The larger bearing took a lot more heat than the smaller bearing.

Posting Permissions

  • You may not post new threads
  • You may not post replies
  • You may not post attachments
  • You may not edit your posts
  •